Friday, June 8, 2012

Week 10


       For the last few weeks the main task to complete were finishing up the data collection, making the powerpoint presentation, and writing the final report. However, in the process of finishing up the model, there was an error in receiving the correct sensor that we originally ordered. The final look of the Sea perch that we created looked like this:


The figure above shows the final look of our Sea perch, which we had to built in a base made out of Azec board to attach the syringe to an ordinary Sea perch. In order to activate the syringe to collect water, we needed a motor. Just as we operated the motor on the control box, we added on a switch to automatically pull the syringe out to collect the water sample. Wooden spool with a v-groove was glued on to the shaft of the motor which was connected to a fishing line and then tied on to the end of the syringe.

 
    the mounted syringe on Azec Board

    Motor connected to one-way switch
    Wooden spool with v-groove.

The goal we set for this project earlier in the term was to get samples of water in different depths and measure the pH using pH paper and depths using a depth sensor. However  only partial work was able to be complete due to erroneously sent pressure sensor.  The way that the pressure sensor was supposed to work was to detect the pressure value in a certain depth in water and then afterwards find the h-height value of placement of sea perch using the formula P=ρ*g*h
Where:
P-pressure
ρ-rho, density of fluid ( pool water)
g-gravity
h-height/depth in water
h=P/ρ*g
However the malfunctioning pressure sensor did not let us get the value of h, which was the height or the depth in water.

We have called in to exchange for a new sensor, but due to time constraint, no further progress was possible. If the time would have allowed it, we would have been able to find out the depths using the pressure sensor and we would have thoroughly complete the task we designed in the project. If the depth of the water were determined as we hoped in the beginning, more and further analysis would have been possible.

Tuesday, May 29, 2012

Friday, May 11, 2012

WEEK 4-5


These past two weeks we have progressed with the building of the seaperch.
We assembled the controller and melted the wax and put the motors in the containers and connected them to the seaperch.


In the pictures above is shown the process of putting the motors together.
Next week we are going to perform a few tests.
We are going to use the PH sheets to record the PH level, a depth sensor ( we're still looking to find an affordable one, but we'll decide by the end of friday's lab and order it asap) to determine the depth in the water and if we can get the underwater digital camera in time we are going to mount that to the seaperch and mount that looking at a digital thermometer which will be recording the temperature.
If we fail to get the digital camera we thought of using a webcam and put it inside a waterproof container that we're going to build ourselves.

Thursday, April 26, 2012

WEEK 3


This passed Friday April 20th, the team met up in lab as scheduled and worked on building the sea perch, which was handed by instructor that same day.
Since the kit came with the white (control box _ the white thing ) it was advised to follow the M.I.T step by step instructions 
but we also looked at 

for extra help building the control box.

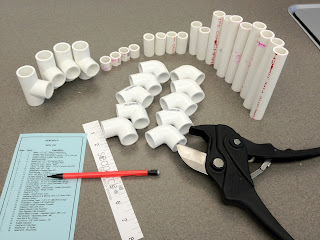
We started cutting all the PVC pieces into smaller sizes as directed in the manual 

Two pieces – 2 1/2” (6.4 cm) long
Two pieces – 4” (10.2 cm) long
Two pieces – 4 1/2” (11.4 cm) long
Four pieces – 1 1/2” (3.8 cm) long
Four pieces – 5” or (12.7 cm) long
Four pieces – 3/4" long


Next we drilled 1/4" drain holes with a drill bit


When we had everything we assembled the frame of the sea perch that looked like this: 


We also started working on the control box but time did not allow us to finish so we arranged to meet before the next lab to work on that and discuss about the sensors.
We would like to include a camera with a flashlight on the body as well to help us move the sea perch better in deep water. 

The team's goal is to collect data concerning the temperature, pH levels, and the clearity of the river water , and is also researching the different sensors necessary to do so.

Wednesday, April 18, 2012

WEEK 2


From our point of view, we have decided that we need to concentrate on designing our SeaPerch kit to do the task of following water samples at different levels of depth in the water. To achieve that, we are going to need a depth sensor and we still need to figure out how our submersible robot is going to be able to collect water sample, so we are thinking on how to build a collector that can hold the water in until sea perch is out of water, an option for that is a syringe. Our plan to design and build our robot can be found on the Design Proposal.

Tuesday, April 10, 2012

WEEK 1


In this blog, we are going to keep everyone updated on a weekly basis on our engineering design project of building a remote operated submersible for water quality testing. In this project, we plan to build and design a SeaPerch kit which is going to be able to do different tasks. However, we need to identify the sensors that are going to be necessary for our SeaPerch to successfully navigate under the water. In addition, we are going to try to design our SeaPerch as simple as possible because we do not want to put to many sensors because we may find it difficult to navigate it under the water. Our group has done research on what kind of sensors we can put on our SeaPerch. We plan to include sensors for measuring the pressure of the water, measuring the depth in the water, or even collecting water samples in different depth levels.